
The holidays are here. Do you feel the festive buzz? It’s time to plan your celebrations. Your outfit is ready. The gifts are wrapped. But wait, what about your fingertips? Your nails deserve some holiday magic, too. They are a small detail that makes a big impact. A perfect manicure completes your winter look. Get ready to find the best Christmas nail ideas.
This year, forget boring, plain polish. It’s the season for sparkle and fun. Think cozy sweaters and glittering lights. Your nails can reflect that joy. Everyone will notice a great holiday manicure. It’s a simple way to feel instantly festive. We’ve gathered stunning looks for every taste. From classic reds to snowy scenes, we have the best Christmas nail ideas for you. Let’s find your perfect holiday manicure.
Featuring 30 Best Christmas Nail Ideas for This Holiday Season
Do you know that the nail extension industry was valued at US$ 4.1 billion in 2022? And these Christmas nail designs play a huge part in this evaluation.
Nonetheless, the list below will give you the best, trending Christmas designs for your nails, along with tips and steps. So, without further ado, here are 30 nail designs you can get inspired by this Christmas.
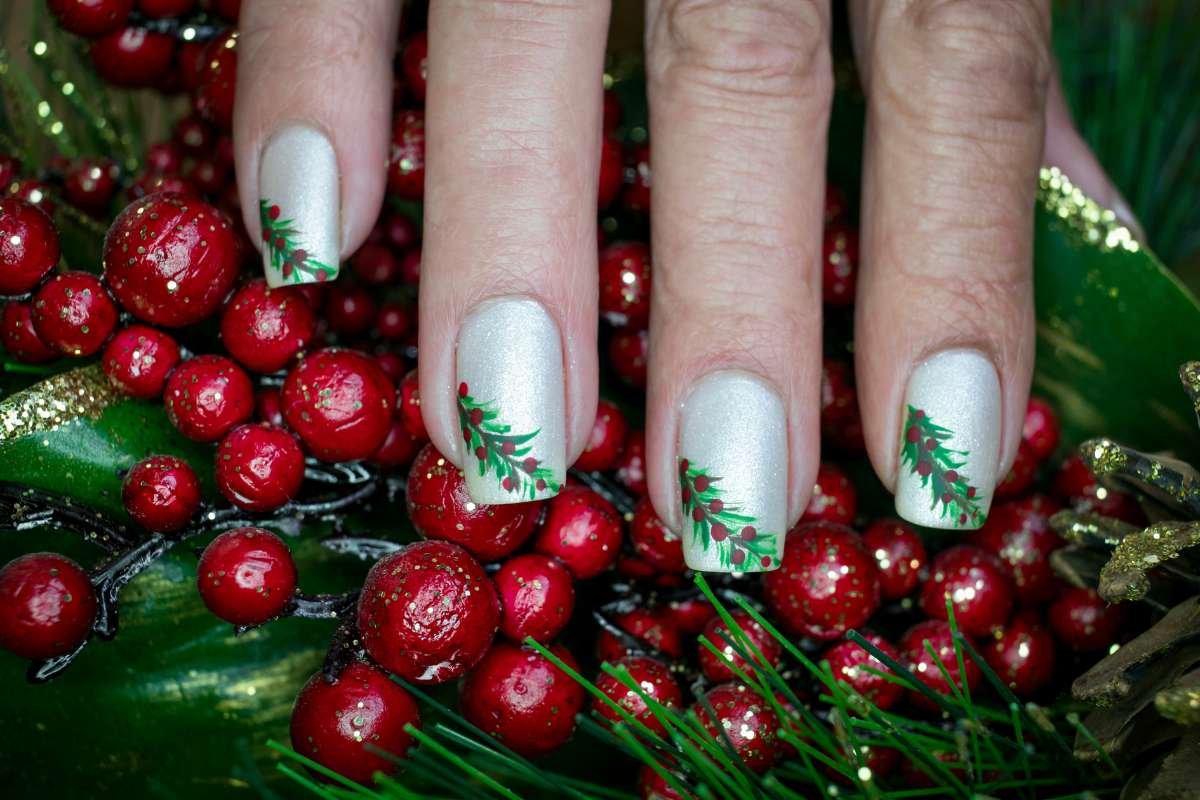
1. Chrome Evergreen Whisper
Tiny chrome Christmas tree accents on a neutral base
This is elegance made simple. Start with a soft, neutral base color. It looks clean and polished. The magic comes from tiny chrome Christmas tree accents. They catch the light beautifully without being too loud. This design is perfect for a chic and modern holiday statement. It offers just a whisper of festive sparkle, making it wearable all season long.
Tips: A soft neutral base and precise placement of tiny chrome decals or carefully painted triangles are key.
How To:
- Start with two coats of a sheer nude or light beige polish.
- Once dry, use a fine detail brush and silver chrome powder (or metallic green polish) to paint tiny, simple Christmas tree shapes on two accent nails.
- Seal with a high-gloss top coat.
2. Pink Candy Cottage
Soft baby-pink Christmas set with candy canes and mini gingerbread details.
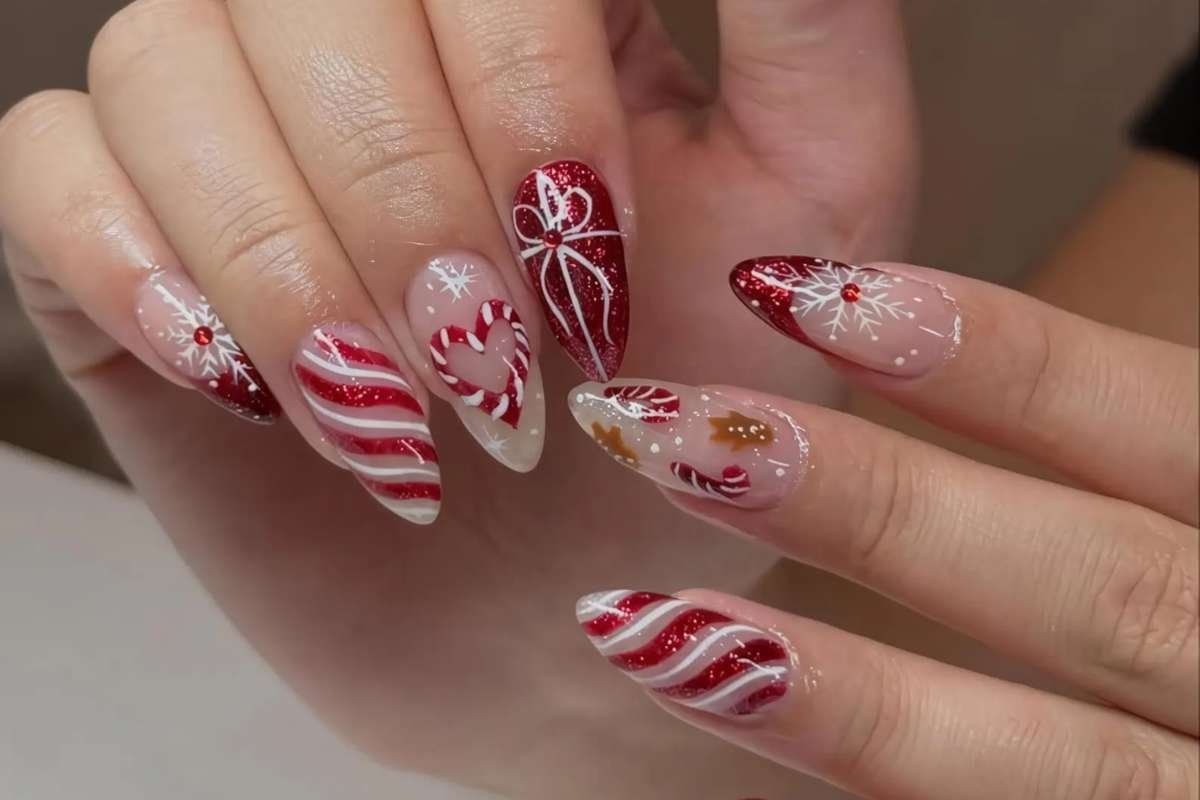
Who says Christmas nail ideas have to be all red and green? Dive into a whimsical holiday with this sweet look. We use a cheerful baby-pink shade as the foundation. Then, add adorable mini details such as playful candy canes and tiny gingerbread figures. It feels like a trip to a sweet shop. This design is charming, fun, and unique for the festive season.
Tips: Balance the bright pink with creamy whites and use small dotting tools for perfect miniature details.
How To:
- Apply two coats of soft baby-pink polish.
- On accent nails, paint small white stripes for the candy cane, or tiny gingerbread men in light brown.
- Use a dotting tool for buttons or small white accents.
- Finish with a clear top coat.
3. Crimson Velvet Edge
Classy red-tipped manicure with a subtle festive twist.
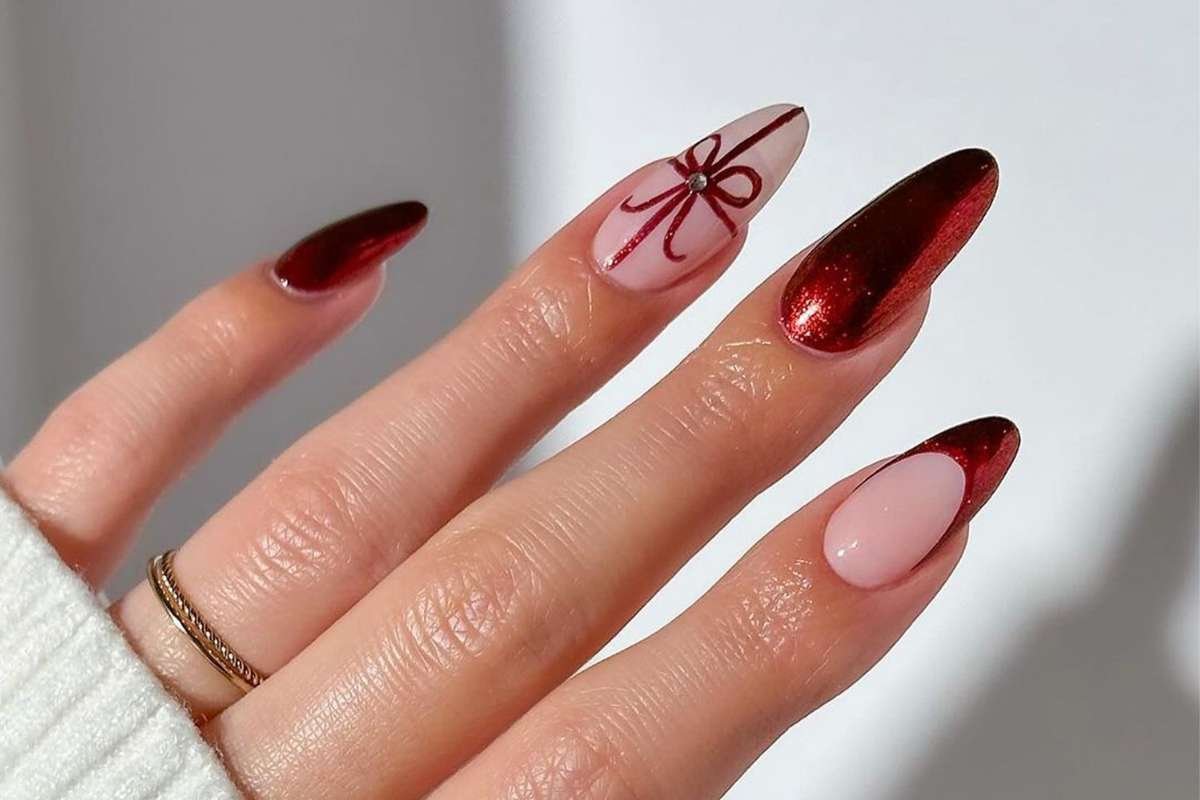
You can’t go wrong with classic red, but we’re giving it a sleek update. This look features a classy red-tipped manicure. It’s subtle yet sophisticated. The “velvet edge” refers to the rich, deep quality of the crimson color. It’s the perfect way to wear a festive color in a highly polished and professional way. Simple, powerful, and totally stylish.
Tips: The secret is using a rich, opaque crimson and ensuring a crisp, smooth line for the tip.
How To:
- Apply a sheer pink or clear base coat.
- Use a deep crimson red to carefully paint the tips of your nails (a thin brush works best).
- For the “velvet” effect, try a matte top coat over the red tips once cured/dry.
4. Diamond Bow Ballet
Sleek bow nail art with delicate gem or “diamond” details.
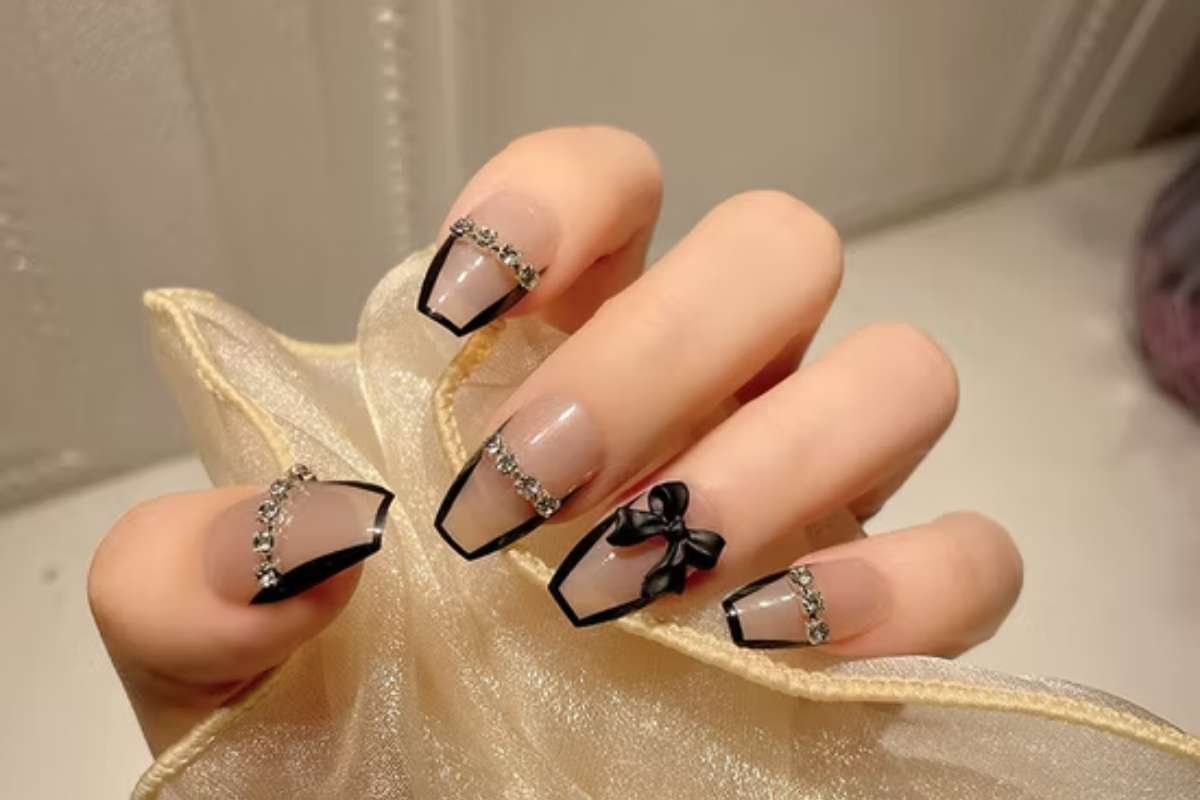
Imagine a delicate bow on a perfect gift box. That’s the feeling of this manicure. The main feature of this design is the sleek, graceful bow nail art. The design is then elevated with tiny, delicate gem or “diamond” details. These small, glittering stones add a touch of luxury and sparkle. It’s refined, feminine, and perfect for any holiday party.
Tips: Use nail glue and tweezers for secure gem placement, and keep the bow art simple and centered.
How To:
- Apply a base color of choice (e.g., nude or white).
- Use black or white polish and a fine brush to paint small, graceful bow shapes.
- While the bow is wet or using nail glue, place a tiny, clear gem (the “diamond”) at the center of the bow.
- Seal the entire nail well with top coat, paying attention to the gem edges.
5. Santa’s Secret Hat
Minimal neutral nails with a tiny Santa hat accent.
This is minimalism with a festive wink. Keep your nails in a soft, minimal neutral shade; think nude or a sheer pink. The accent is the sweetest part: a single, tiny Santa hat painted on one or two nails. It’s a fun secret that only those who look closely will notice. This design is perfect for those who love understated style but still want it to look celebrative.
Tips: Keep the neutral base truly minimal, and ensure the Santa hat is drawn small and placed subtly, near the cuticle.
How To:
- Apply a clean, sheer nude polish.
- Use a fine detail brush to paint a tiny red triangle (the hat base) near the cuticle corner of one nail.
- Add a white border and a tiny white dot (the pom-pom) to complete the Santa hat design.
- Seal with a glossy top coat.
Read More:
- 52 DIY Christmas ornament ideas that are easy to make
- 15 Christmas Holiday Themes for 2025: Cozy, Creative & Stress-Free
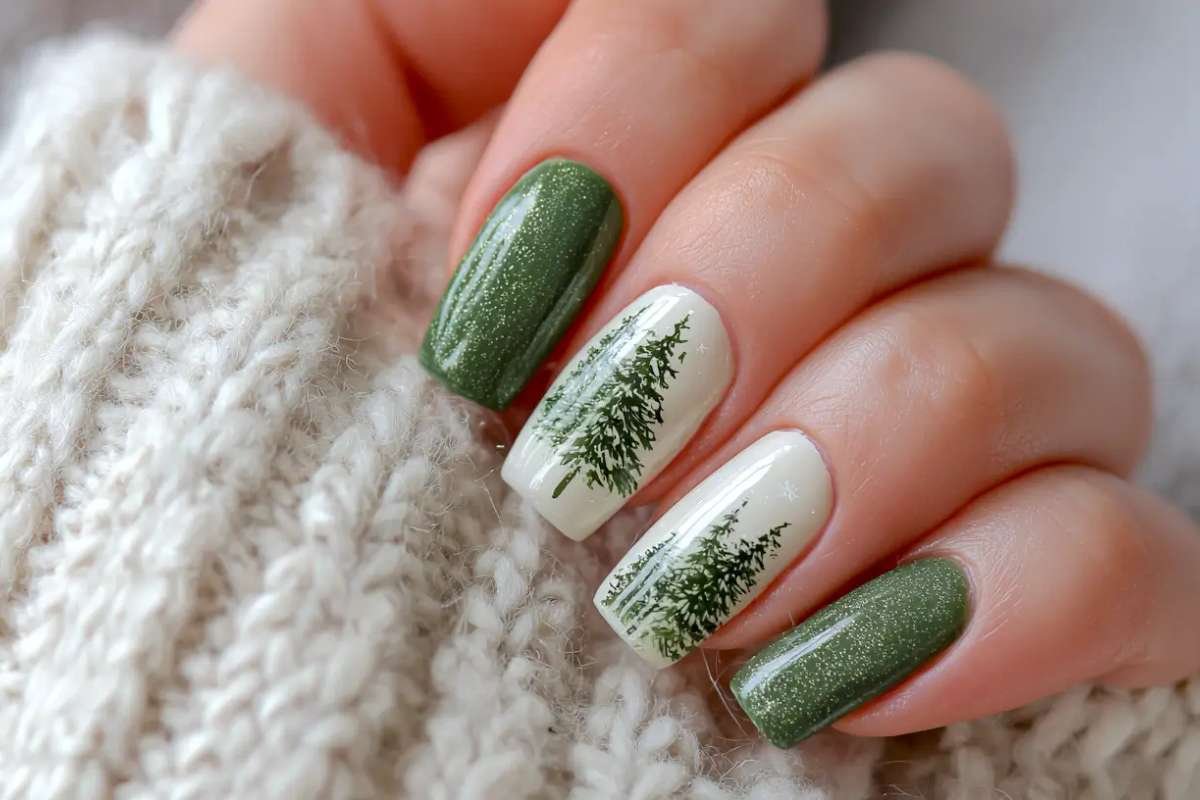
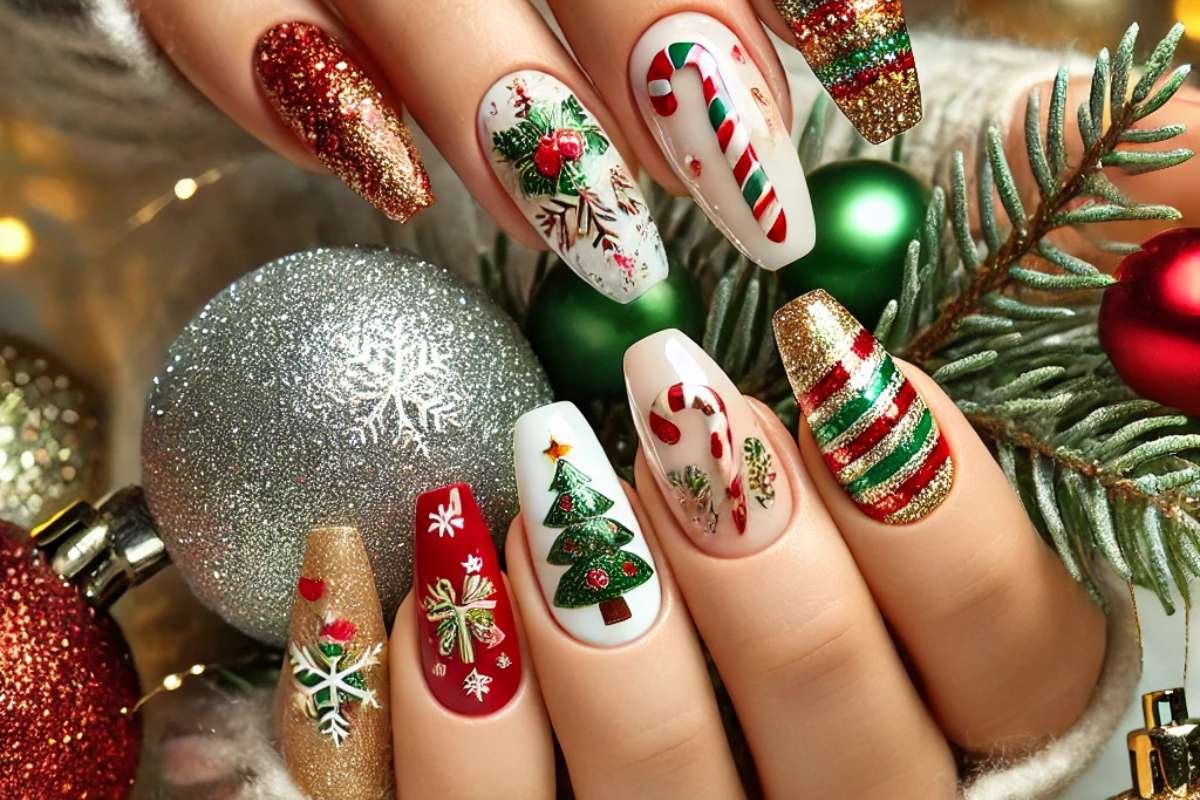
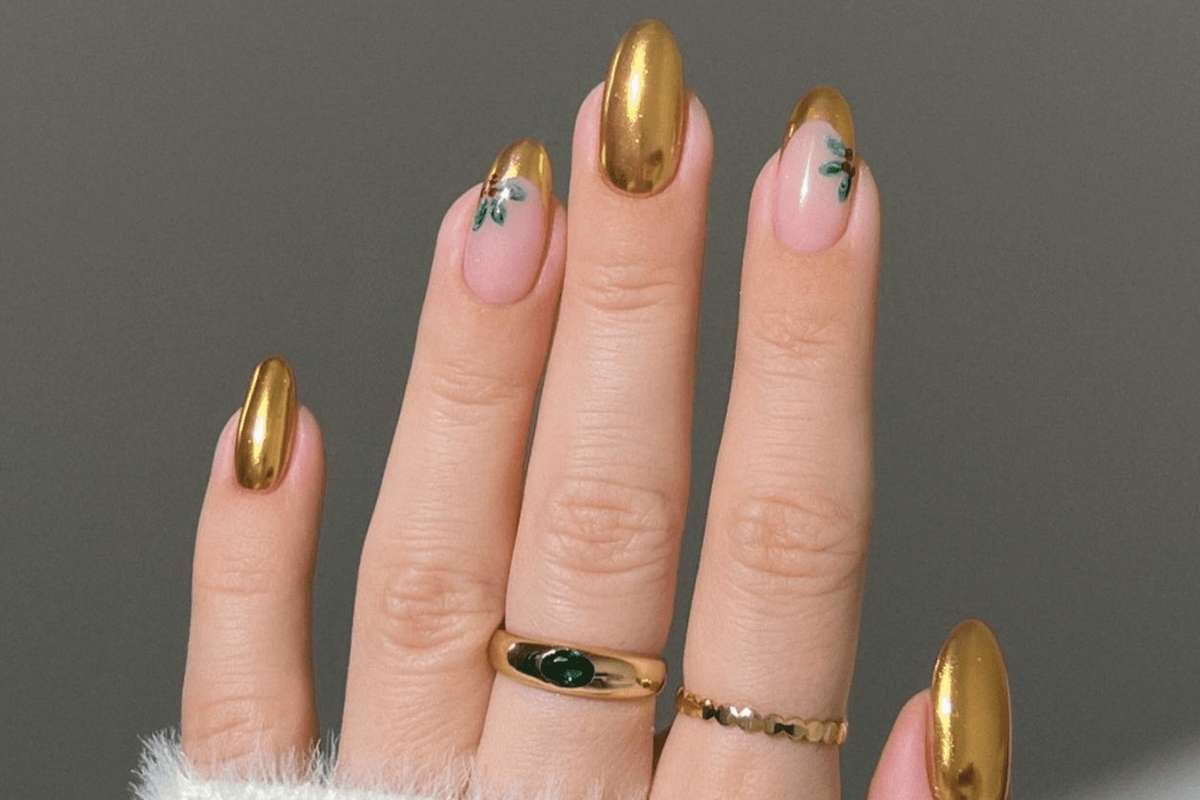
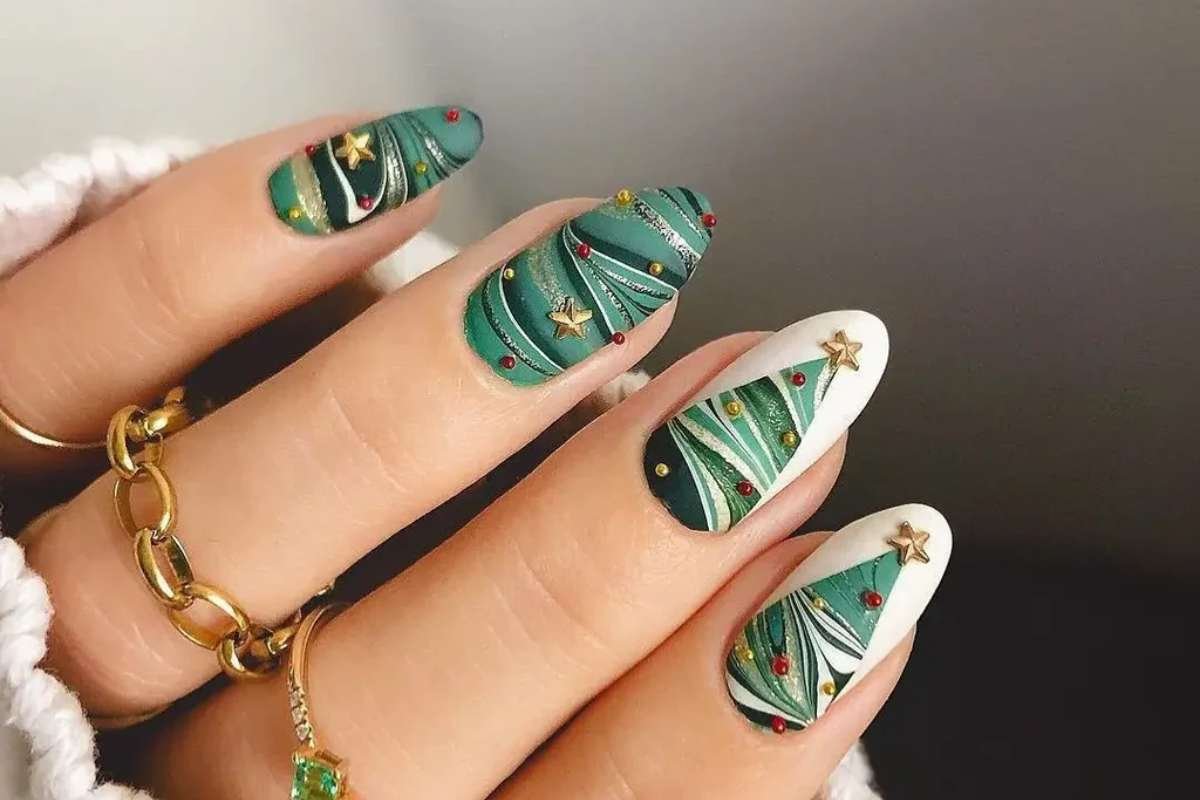
6. Golden Forest Fiesta
Green and gold mix-and-match set with trees and lots of sparkle.
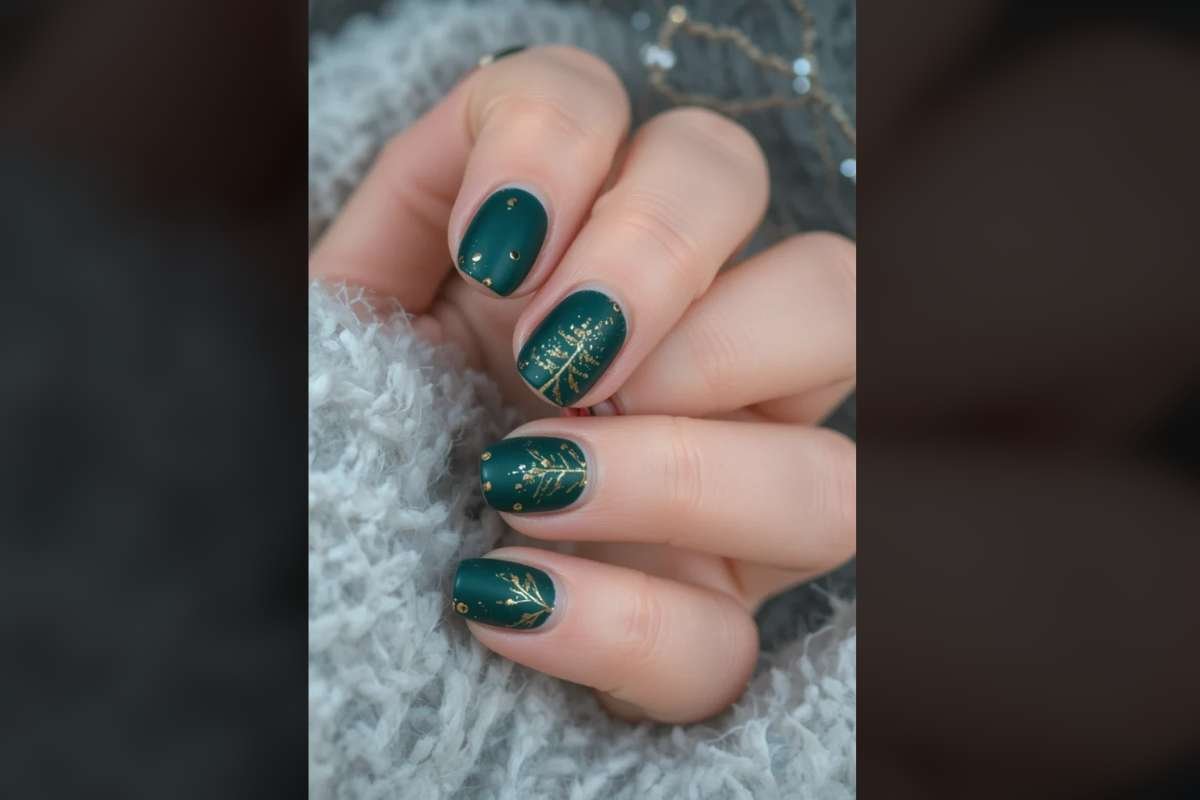
Bring the richness of a winter forest to your fingertips! This design combines deep emerald greens with dazzling gold accents. It’s a fun, mix-and-match set where each nail offers something different. Think sparkling trees, shimmering stripes, and lots of brilliant glitter. This look is bold, festive, and truly captures the joy of the holidays.
Tips: Varying the glitter density and mixing design on different nails creates the playful “fiesta” look.
How To:
- Apply deep emerald green on some nails and a gold glitter polish on others.
- On a green nail, use a fine brush and gold polish to paint simple Christmas tree outlines.
- On a gold nail, add subtle green stripes or dots for variation.
- Finish with a thick, glossy top coat to lock in the glitter.
7. Pudding Dream Swirl
Christmas pudding-inspired design using chocolate brown and soft pink.
Get cozy with this deliciously unique design in Christmas nail ideas! We draw inspiration from a classic Christmas pudding. The base is made of warm, chocolate-brown, and soft, creamy pink colors. Swirls and dots mimic the festive treat’s design. It’s an unexpected but charming combination. This look is a beautiful way to celebrate the holiday feasting season in a subtle, artsy way.
Tips: Achieve the pudding effect by blending the chocolate brown and soft pink on a creamy base.
How To:
- Apply two coats of a creamy neutral or soft pink base.
- Use warm chocolate brown polish to create a soft, rounded ‘pudding’ shape at the tip.
- Add small swirls and dots of the soft pink polish on top of the brown to mimic the frosting/sauce.
- Top with a clear top coat.
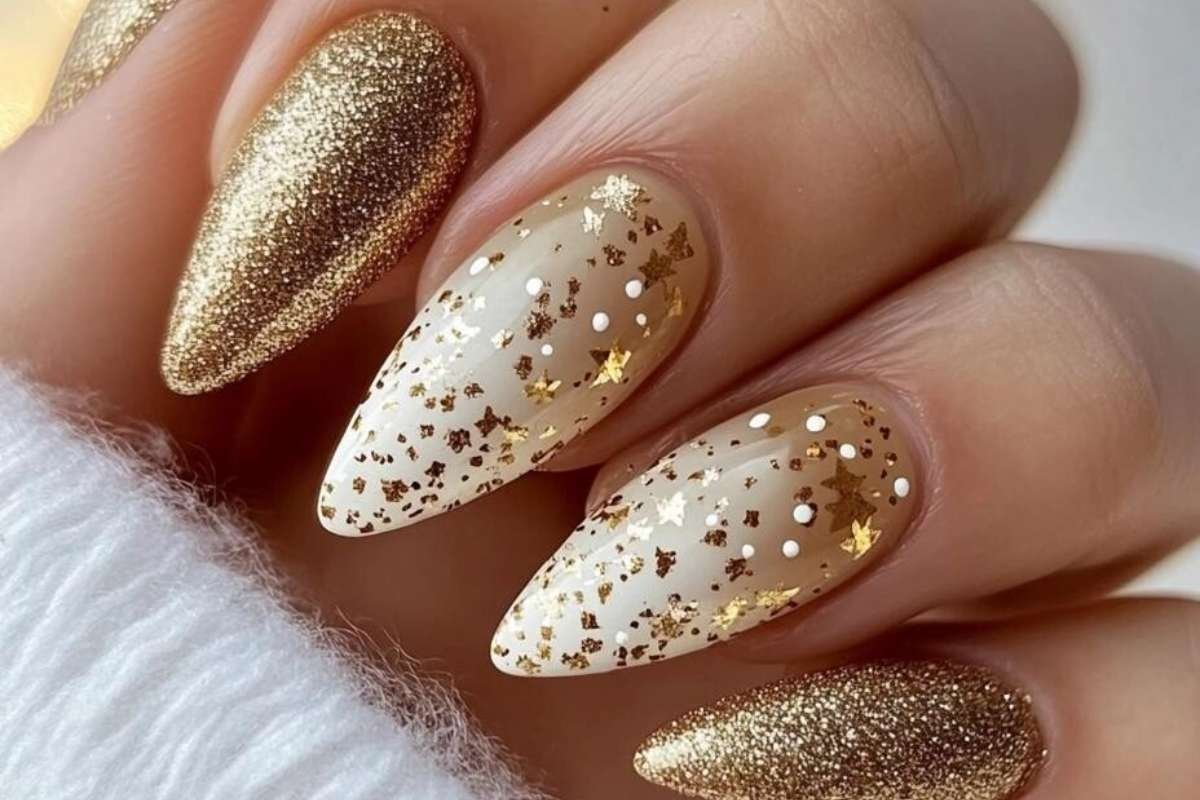
8. Starry Night Sparkle
Star-focused Christmas manicure with scattered metallic stars.
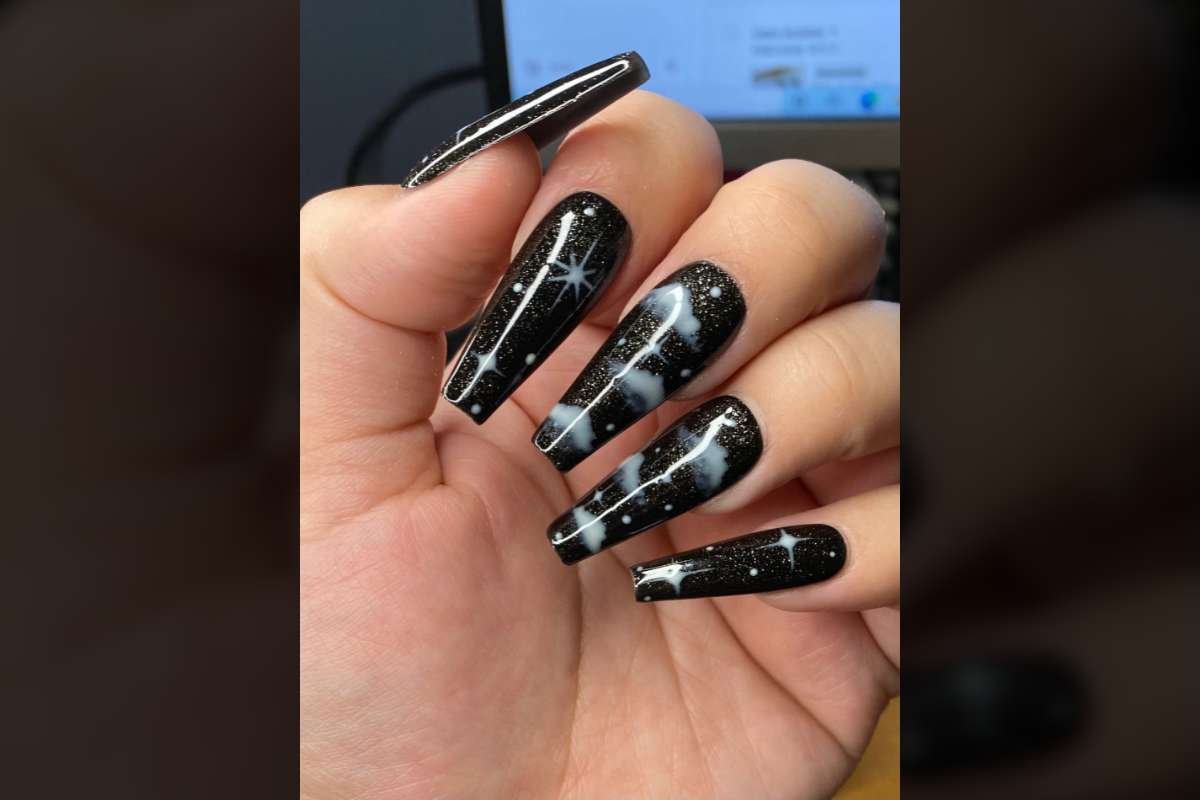
Look up at the clear winter sky for this inspiration. This manicure focuses entirely on stars. Scattered metallic stars shine brightly across the nails. You can use different sizes and colors of gold or silver for a truly cosmic effect. The sparkle catches the light like fresh snow. It’s a whimsical and fun way to bring a little nighttime magic to your holiday look.
Tips: Use different sizes of metallic stars or star glitter for depth, and keep the base color dark and clean.
How To:
- Apply a rich, deep blue or black polish for the “night” sky.
- Use gold and silver metallic polish (or scattered star decals) to place tiny stars randomly across the nail.
- Ensure the stars are well-scattered, avoiding dense clusters.
- Seal with a layer of clear top coat.
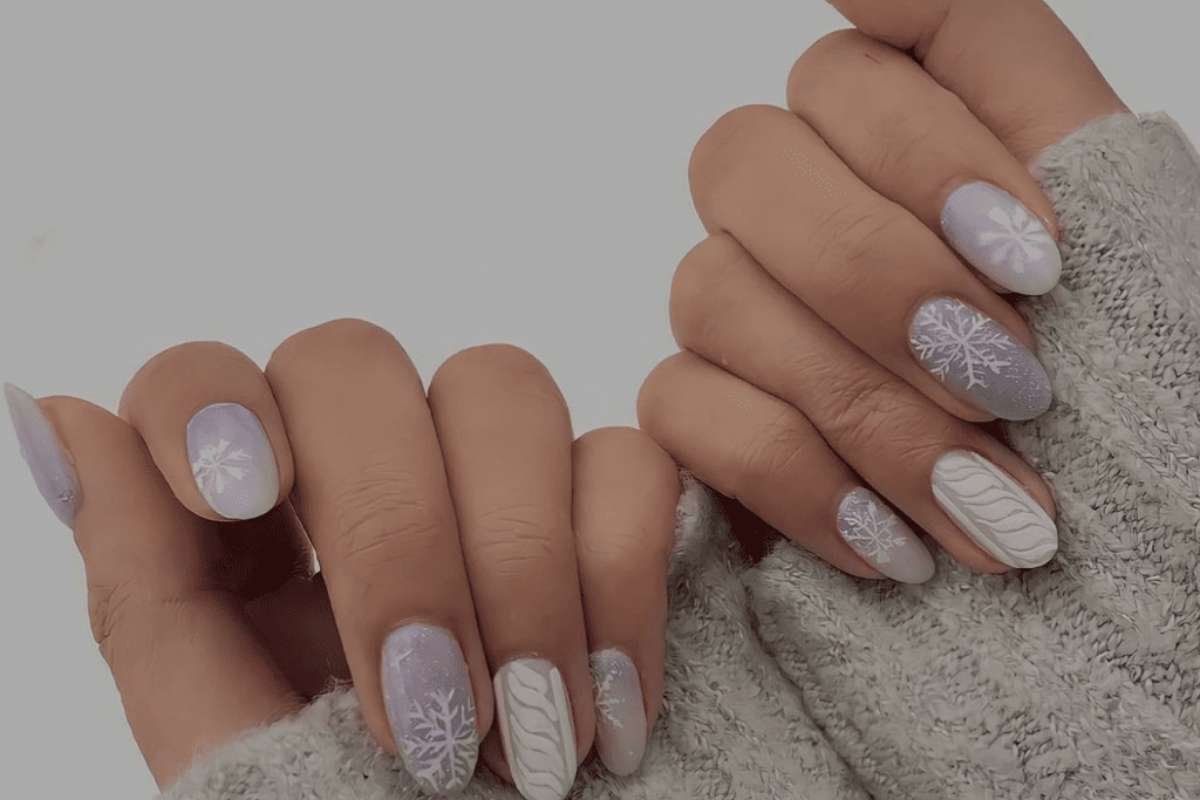
9. Cozy Knit Wonderland
Cable-knit or “Christmas jumper” textured nails for a cozy look.
Nothing says “winter comfort” like a cozy knit sweater. This design brings that texture right onto your nails! Using a special technique, we create a 3D cable-knit or “Christmas jumper” effect. Choose soft, muted colors such as cream or dusty blue. It looks so wonderfully textured and warm. Perfect for snuggling by the fire with a warm drink.
Tips: Special 3D gel or acrylic powder mixed with gel polish is needed to build the cable-knit texture.
How To:
- Apply a soft, muted color (like cream or gray) base coat and cure.
- Using a thicker polish or a special gel mixed with clear acrylic powder, carefully pipe the cable-knit pattern onto the nail.
- Cure the 3D pattern completely without applying a top coat (to maintain the sweater texture).
10. Glittered Neutral Glow
Simple neutral manicure upgraded with a hint of festive glitter.
Want a festive feel without all the fuss? Start with a simple, chic neutral manicure. Think milky white or a soft blush. The upgrade is a sophisticated hint of festive glitter layered on top or blended at the tip. It adds a subtle glow that feels elevated and appropriate for any setting. It’s the perfect touch of holiday polish.
Tips: A very fine, high-quality glitter polish ensures the sophisticated, subtle shimmer.
How To:
- Apply two coats of a chic neutral polish (milky white, sheer pink, or nude).
- Apply a thin, single coat of fine silver or champagne glitter polish over the entire nail, or blend it gently from the tip down.
- Seal with a glossy top coat.

80 Best Christmas Dinner Recipes for a Warm and Memorable Holiday Feast
These 80 Christmas dinner recipes go beyond taste. They include stories, origins, and expert tips to help you create a nostalgic and memorable holiday meal.
11. Chic Frost Whisper
Polished, minimalist Christmas manicure in chic neutral tones.
This manicure is for the minimalist with high standards. It is polished, clean, and utterly modern. The design only has chic neutral tones, such as cool gray, crisp white, or barely-there beige. The “frost whisper” comes from a sheer, delicate sheen or a very fine, icy white line. It’s a simple, sophisticated take on winter elegance.
Tips: The key is precise application and a clean, cool-toned neutral palette for ultimate sophistication.
How To:
- Apply two coats of a cool-toned neutral (e.g., light gray, bone white).
- Finish with a very high-shine top coat for a polished look.
- Optional: Add a tiny, razor-thin line of icy silver or white metallic polish near the tip or cuticle.
12. Sparkly French Frosting
Classic French manicure with a subtle sparkly holiday twist.
Take your favorite classic French manicure and add a touch of holiday sparkle. We keep the base clear and the white tip shape traditional. The holiday twist is a fine layer of silver or iridescent glitter mixed into the white tip. It looks like the tip has been dusted with fresh, winter snow. This is an elegant and timeless festive look.
Tips: Mix fine holographic or silver glitter into your white tip polish for an icy, frosted effect.
How To:
- Apply a clear or sheer nude base coat.
- Apply the French tip, using a white polish that has been mixed with very fine silver or iridescent glitter.
- Ensure the tip line is clean and even.
- Seal with a clear top coat.
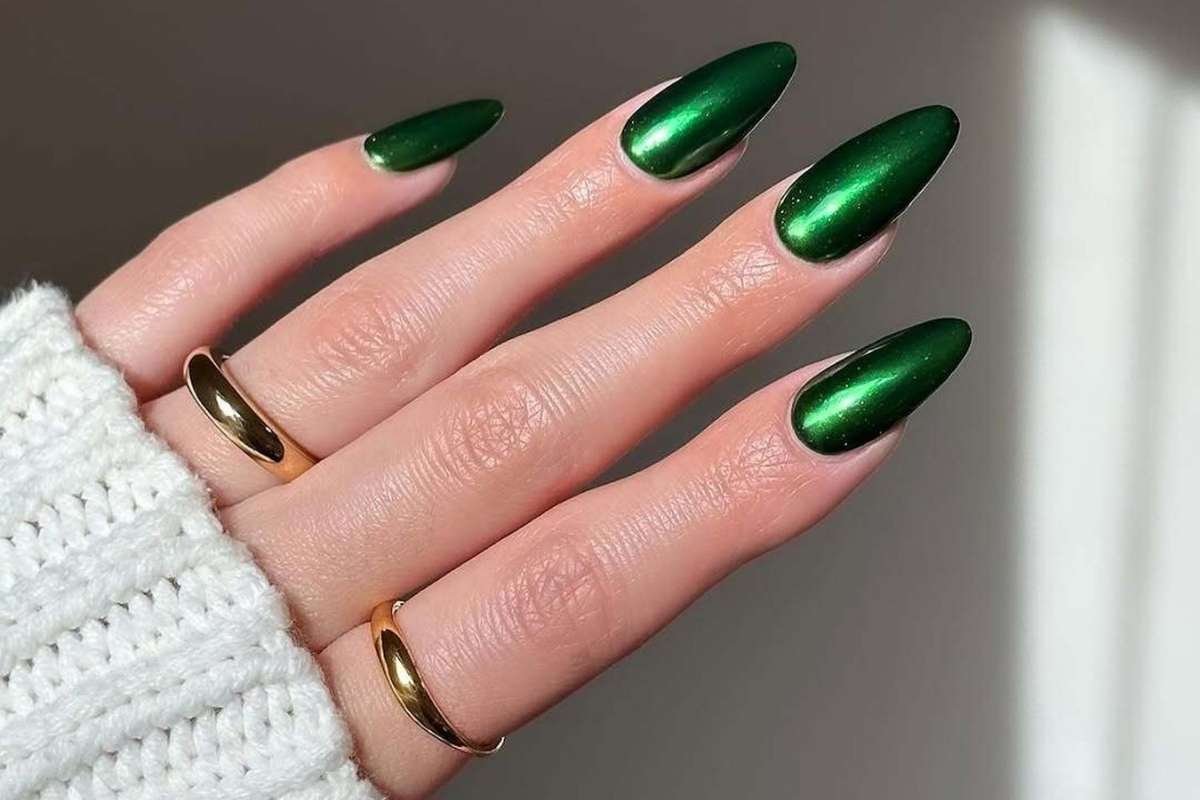
13. Holly Emerald Elegance
Solid holly-green nails for an elegant party look.

Sometimes, a bold block of color is all you need. This look focuses on a solid, rich holly-green polish. The shade is deep, vibrant, and incredibly luxurious. It instantly gives an elegant, powerful feel. This color choice is perfect for a big holiday party or any event where you want a sophisticated and festive statement.
Tips: Use a polish with a deep, rich pigment to achieve powerful, solid coverage and high shine.
How To:
- Apply a base coat to protect the natural nail.
- Apply two even, opaque coats of a rich holly-green polish.
- For maximum elegance, finish with a high-gloss, magnifying top coat.
14. Gold Star Symphony
Gold-star nail art on various base colors for a playful, festive touch.
This design is a playful, upbeat take on the starry trend. Gold star nail art is placed on various base colors across the set. Mix deep green, classic red, and a nude shade for a fun combination. The bright gold stars feel celebratory and light-hearted. It’s a perfect way to show off your festive mood in a joyful, graphic style of Christmas nail ideas.
Tips: The playful look comes from alternating base colors and the uniform, bright gold star accents.
How To:
- Paint nails alternating between deep green, classic red, and a nude shade.
- Once dry, use gold star decals or a tiny brush and bright gold polish to add one or two stars to each nail.
- Seal the entire set with a clear top coat.
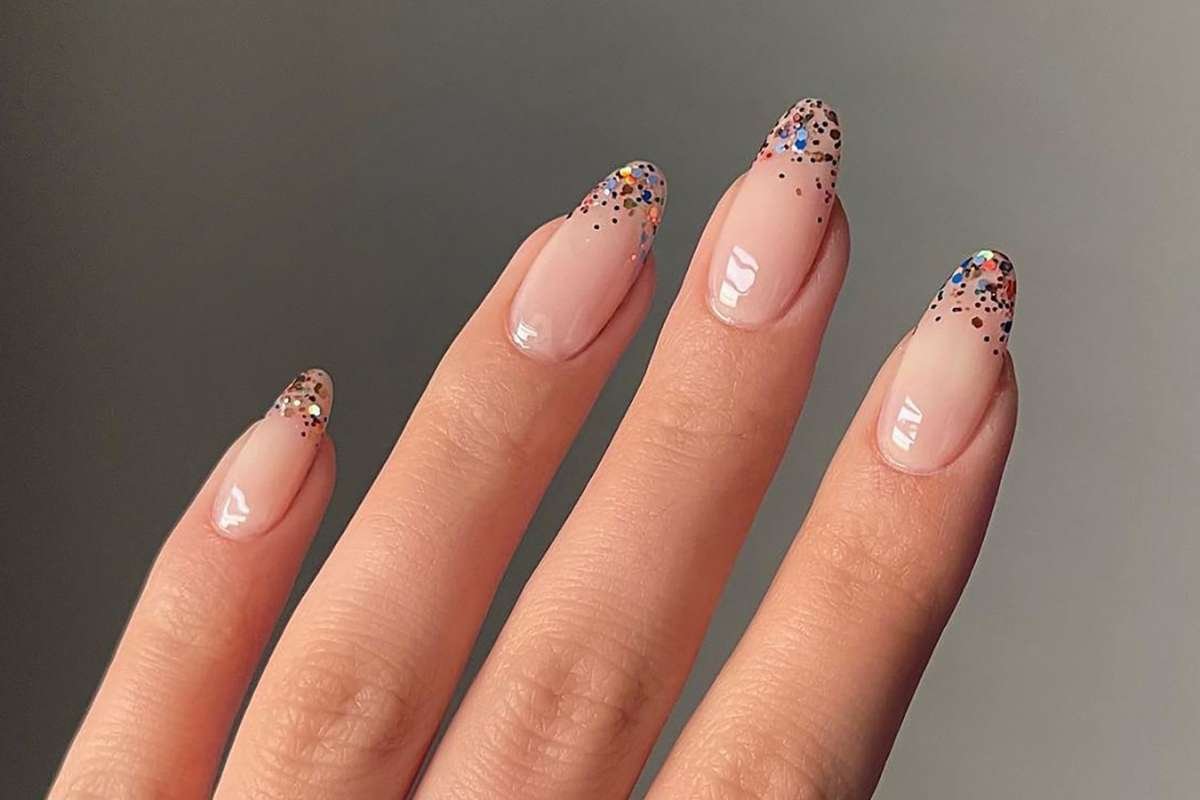
15. Glitter Tip Galaxy
Glitter French tips (“sparkly Frenchies”) for those who love a bright edge.

If you love a little drama at the edges, this is for you. This is the “sparkly Frenchie” style at its best. Instead of a traditional color, we use a bold, glittering polish for the French tip. Think rich gold, vibrant red glitter, or emerald green sparkle. It gives a sharp, bright edge to the nail. Simple base, maximum festive impact.
Tips: Achieve the “galaxy” effect by using chunky or multi-colored glitter polish only on the tips.
How To:
- Apply a clear or sheer base coat.
- Carefully paint the French tip area using a bold, richly pigmented glitter polish (red, gold, or mixed shades).
- Ensure the glitter polish is applied densely only on the tip.
- Seal with a thick layer of top coat to smooth the glitter texture.
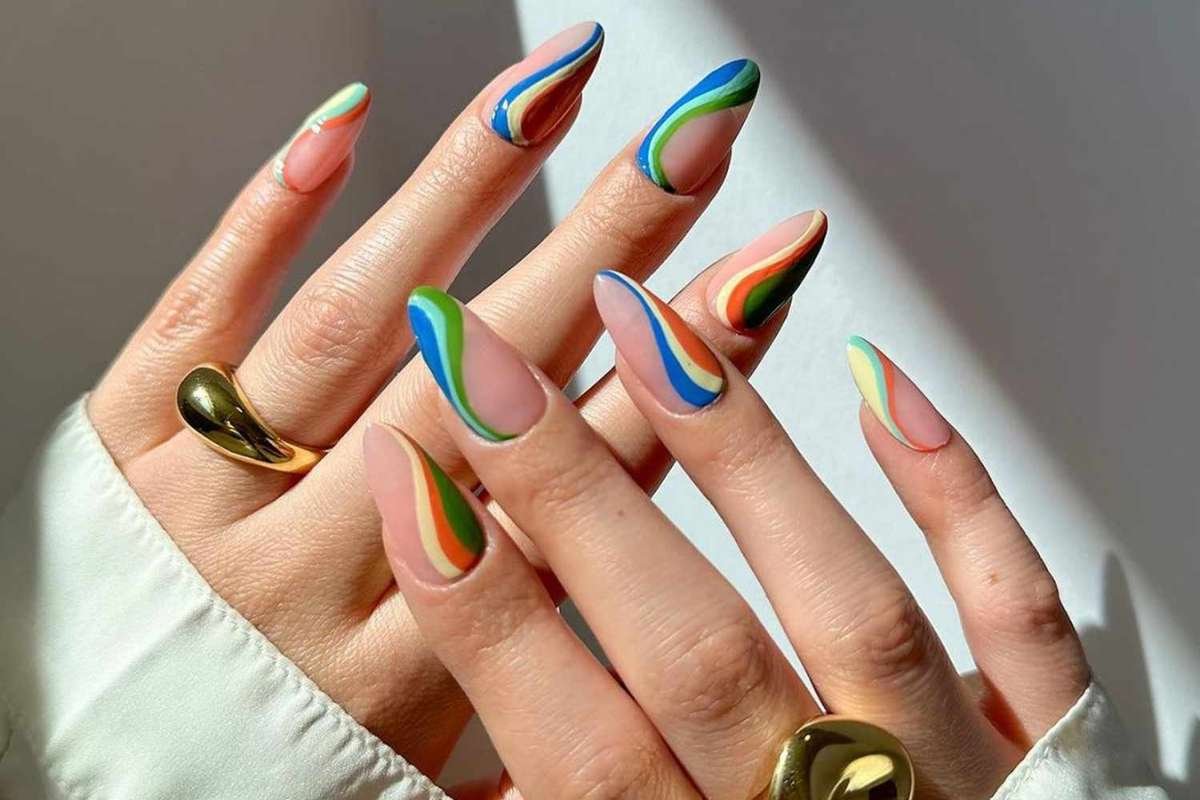
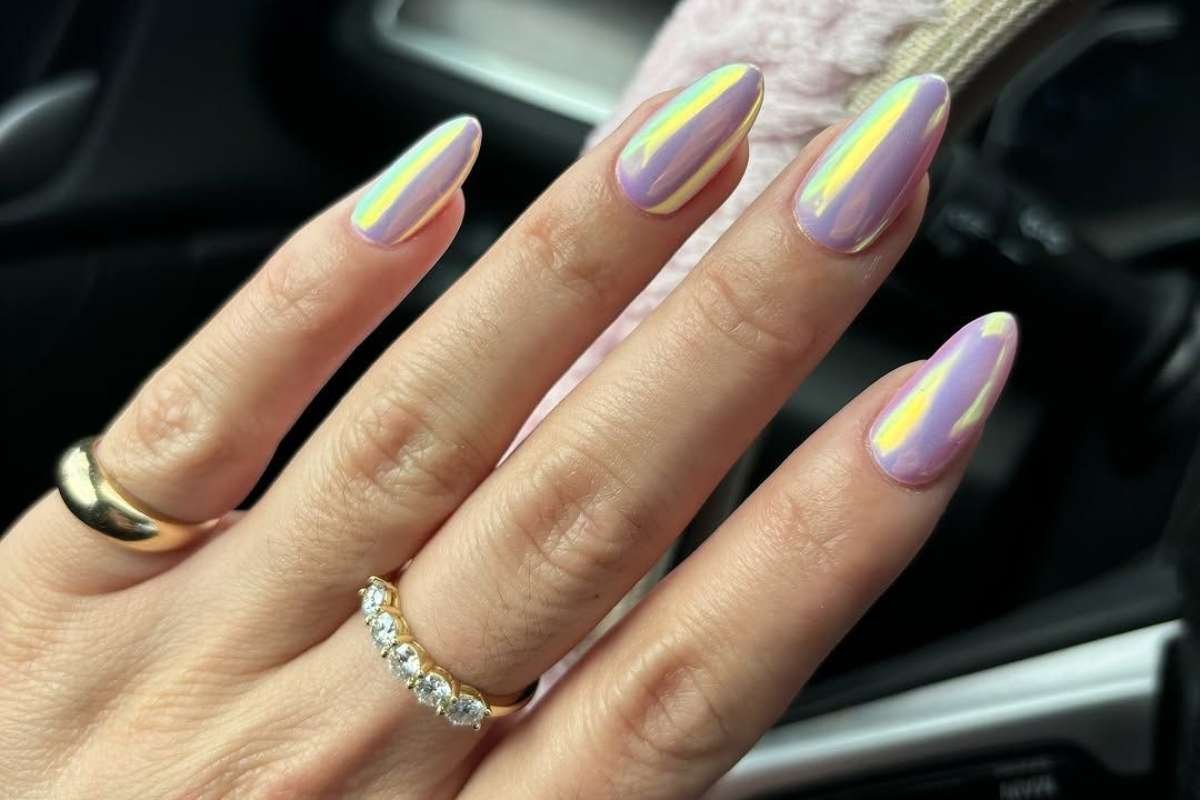
16. Candy Shop Carnival
Mix-and-match “candy shop” nails in pink and purple holiday shades.

Get ready for a super fun, mismatched holiday look! This style uses pink and purple holiday shades for a playful twist on tradition. Combine different patterns such as dots, stripes, and simple shapes across the set. It feels bright, happy, and full of energy. This is a joyful, non-traditional manicure for those who love color.
Tips: Success relies on a cheerful palette of pinks and purples, and fun, distinct patterns on each finger.
How To:
- Choose a fun mix of pink and purple polishes.
- Design each nail differently: one stripey, one polka-dotted, one solid pink, etc.
- Use white polish for candy-like accents and swirls.
- Finish with a clear top coat.
17. Icy Snowflake Breeze
Icy blue French tips with white snowflake accents.
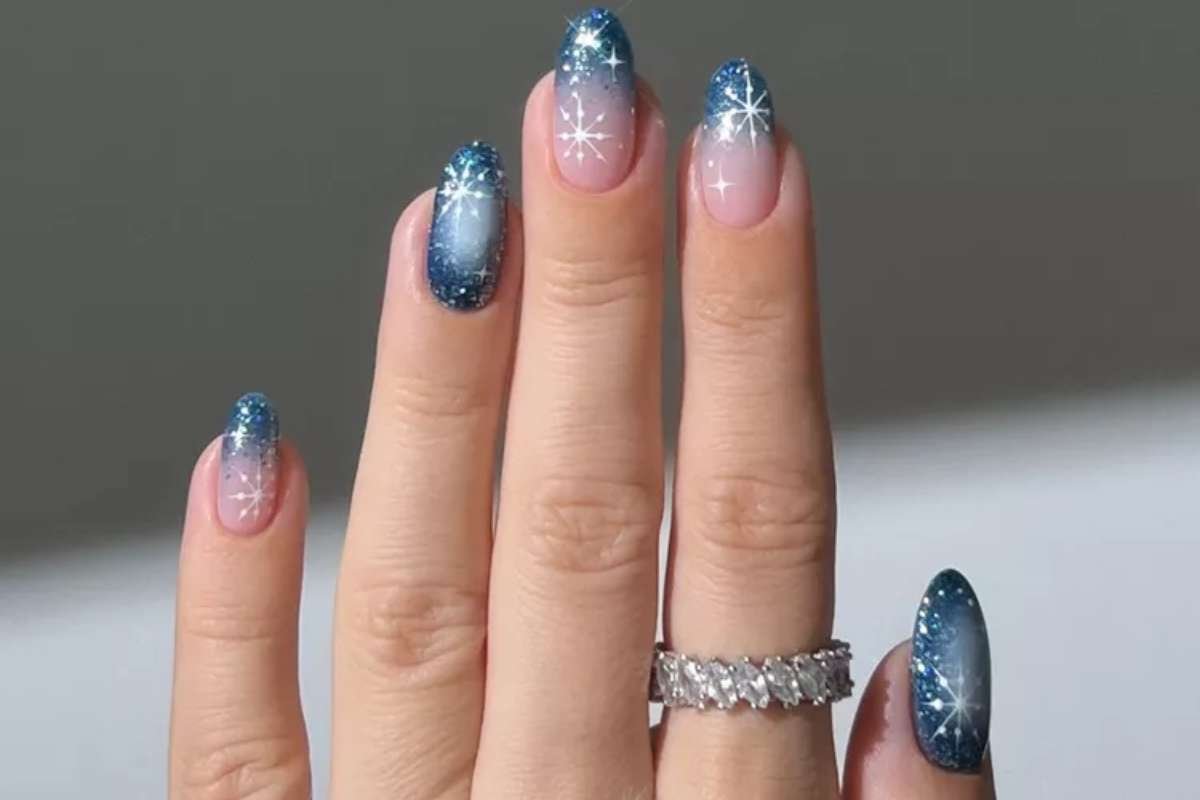
Embrace the beauty of a cold winter morning. This design uses icy blue for the French tips. The contrast is achieved with delicate white snowflake accents painted on the clear or sheer base. It’s a fresh, crisp, and clean look. This manicure perfectly captures the quiet, frosty beauty of a snowy winter day. And most importantly, it is very simple and quick.
Tips: Use a pale, frosty blue and very fine brushes or stamping plates for intricate, delicate white snowflakes.
How To:
- Apply a clear or sheer base coat.
- Paint the French tips using an icy, light blue polish.
- Using white polish and a thin brush, paint tiny, simple snowflake accents on the clear part of the nail.
- Seal with a clear top coat.
18. Berry Wine Enchantment
Deep burgundy “winter berries” manicure inspired by red wine tones.
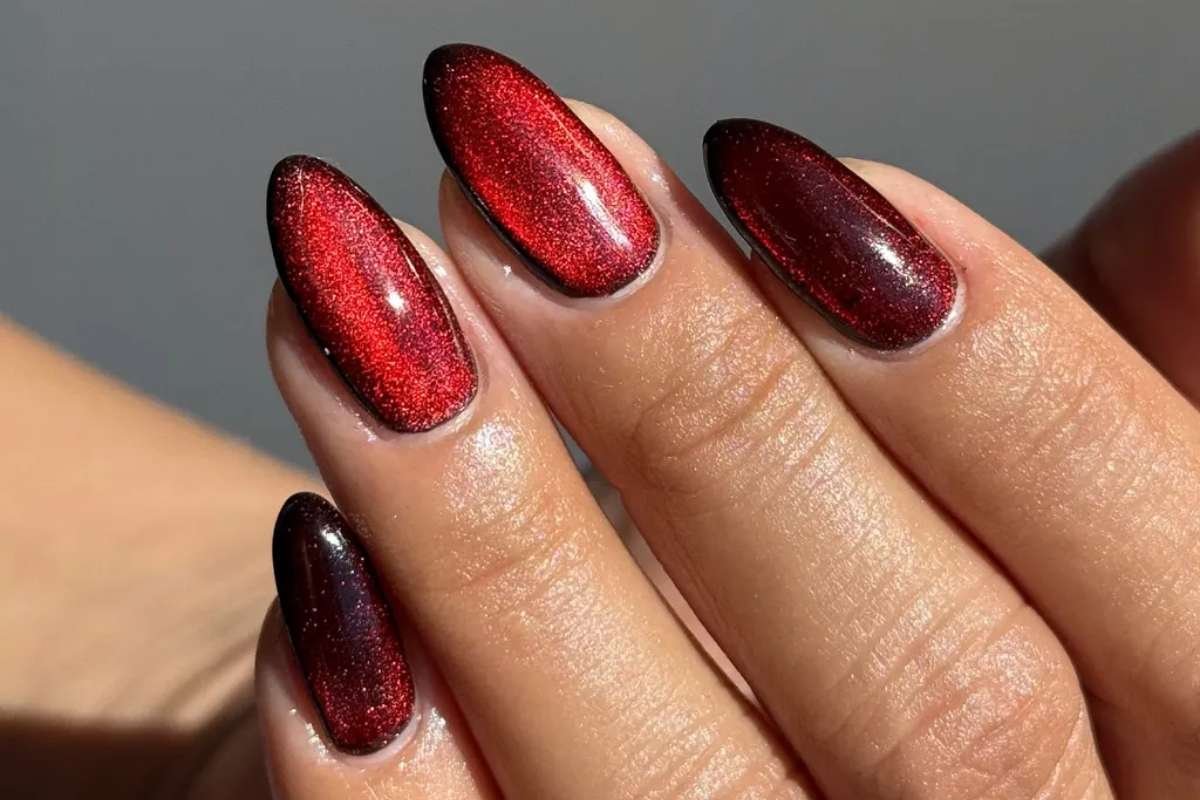
For a sophisticated holiday feel, choose this rich manicure. It uses a deep burgundy or ‘winter berries’ polish. This color is inspired by the warmth of red wine and the season’s dark fruits. It’s a classic, grown-up shade that feels luxurious and enchanting. This is the perfect color for a winter evening look.
Tips: The key is a highly pigmented, deep burgundy shade that looks luxurious and glossy.
How To:
- Apply a protective base coat.
- Apply two or three coats of the deep, rich burgundy (berry wine) polish until fully opaque.
- For the most sophisticated look, choose a polish with a slight jelly finish or a highly reflective top coat.
19. Classic Holly Harmony
Classic red-and-green festive combo, kept chic and wearable.

This design has the traditional holiday colors, but is also chic and totally wearable. It uses a tasteful combination of classic red and deep green. You can use simple lines, tiny dots, or small color blocks. The key is to keep the art minimal and polished. It’s a festive combo that is guaranteed to never go out of style.
Tips: Use muted, balanced red and green, and apply tiny, simple geometric shapes for a modern feel.
How To:
- Apply a neutral base. Paint some nails solid classic red and others solid deep green.
- On the solid colors, use the opposite color (or gold) to create small dots or thin lines near the cuticle.
- Keep the art clean, minimal, and geometric.
- Finish with a high-shine top coat.
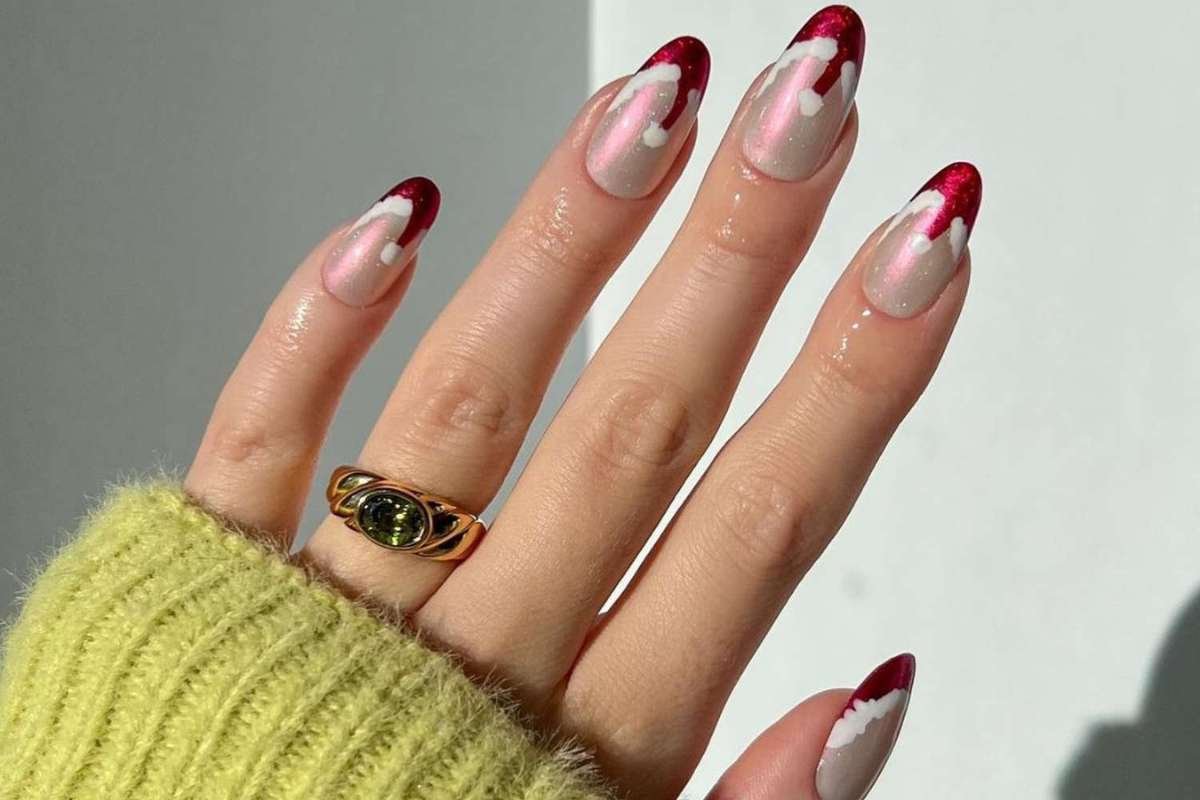
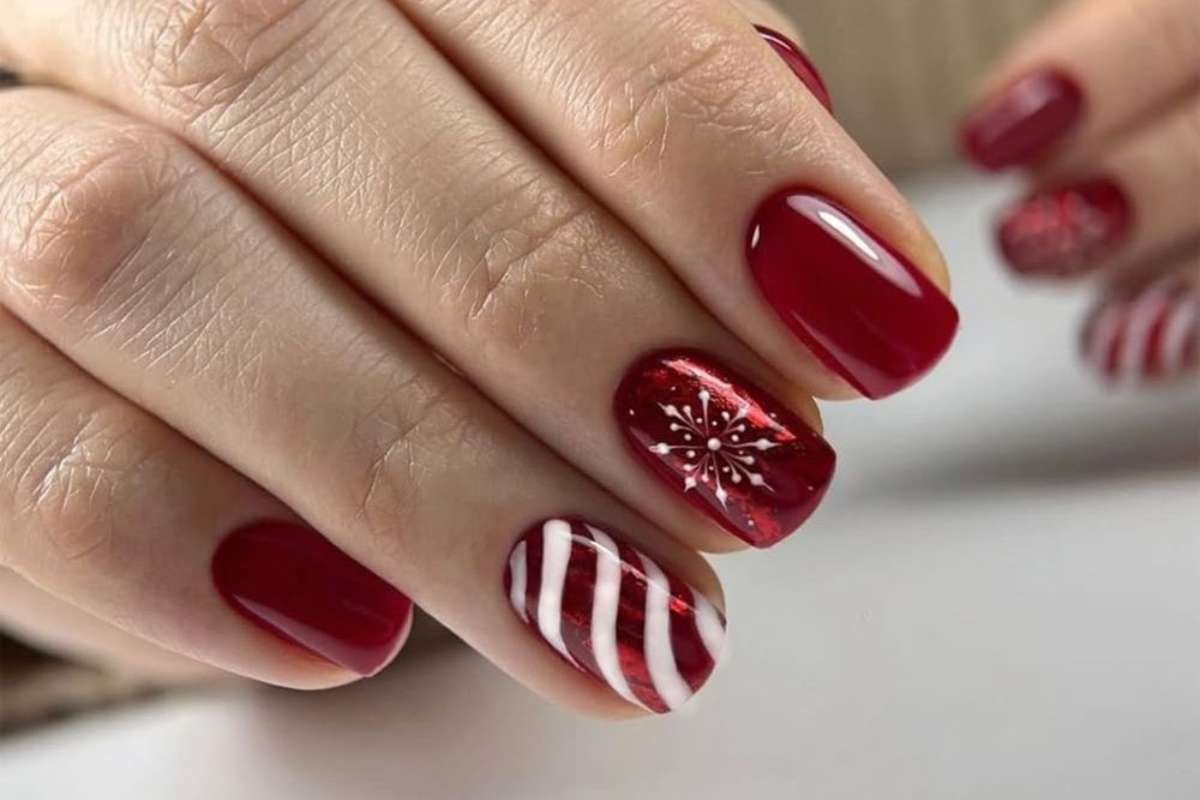
20. Santa Baby Blaze
High-shine red “Santa” manicure for a bold Christmas statement.
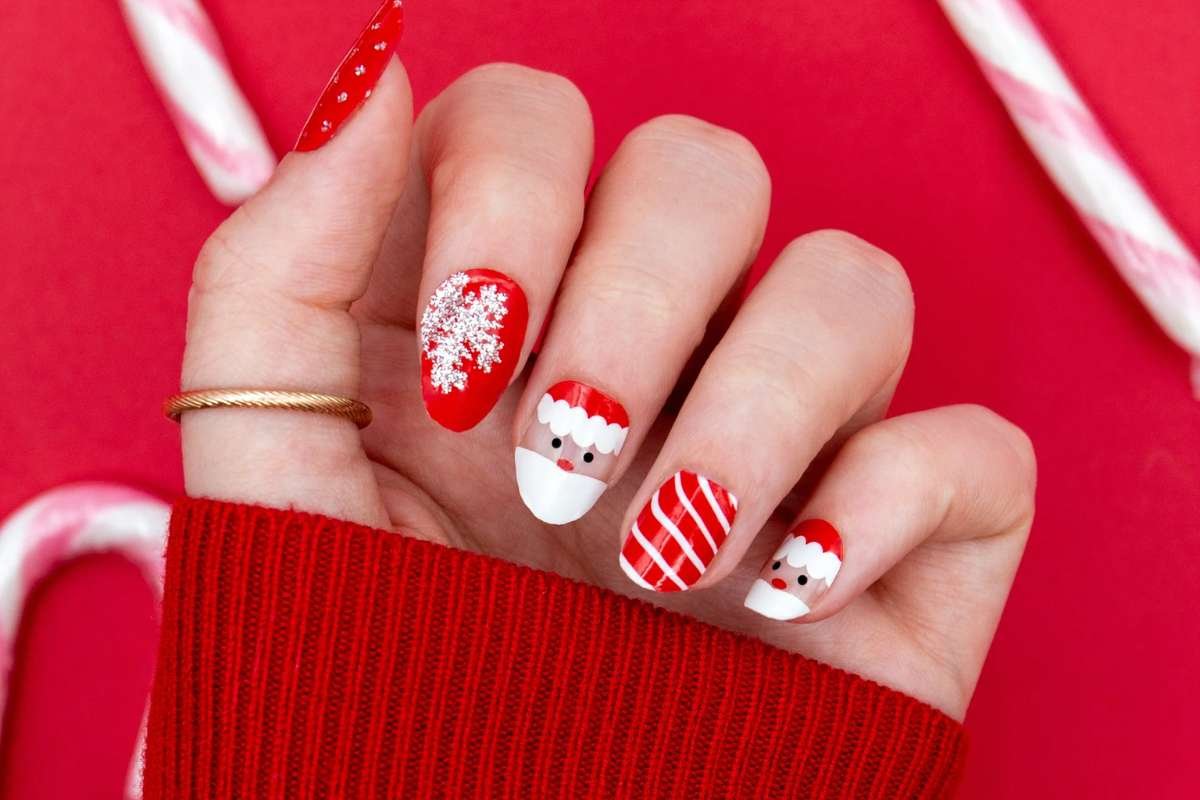
Make a bold, unforgettable statement with this fiery look. It’s a high-shine red manicure, inspired by the classic Christmas song. The polish should be glossy, deep, and utterly vibrant. This is a one-color look that demands attention. It’s the ultimate confident, bold, and dazzling manicure for the festive season.
Tips: Choose a high-shine, true primary red that is perfectly opaque in two coats for the boldest statement.
How To:
- Apply a base coat to prevent staining.
- Apply two flawless, smooth coats of a vivid, high-shine red polish.
- Seal with a very thick, glossy top coat for maximum “blaze” and longevity.
Read More:
- 15 Heartfelt Christmas Gift Ideas for Best Friends Designed to Celebrate Friendship in Meaningful Ways
- Creative Office Christmas Party Themes That Boost Team Spirit and Productivity
21. Chrome Sheer Mirage
Minimalist chrome accents on sheer bases for a modern holiday look.
This is the epitome of modern holiday chic. The design for Christmas nail ideas uses a sheer, barely-there base color. The detail is a minimalist chrome accent; perhaps a thin line, a small shape, or a simple stripe. The chrome creates a beautiful, subtle reflection. It’s a sophisticated, sleek, and futuristic way to add holiday metallic shine.
Tips: The chrome accent must be extremely thin and applied over a perfectly sheer base for the subtle effect.
How To:
- Apply one coat of a sheer, milky pink or nude polish.
- Once cured/dry, use a very fine striping brush or nail tape and chrome powder to create a thin, minimalist line (e.g., a diagonal stripe).
- Seal quickly with a top coat to prevent the chrome from dulling.
22. Nude Glitter Aurora
Nude nails with fine glitter gradients that feel wintery but subtle.
Elevate your everyday nude manicure with a touch of winter magic. This design features a fine glitter gradient blended over the nude base. The glitter should be icy silver or iridescent, like a winter aurora borealis. It’s wintery and subtle at the same time. The look is totally polished and feels like a beautiful, delicate frost.
Tips: The nude base should match your skin tone well, and the fine glitter should be gently faded/blended upwards.
How To:
- Apply two coats of your chosen nude polish.
- Using a fine silver or iridescent glitter polish, concentrate the glitter at the tip and lightly feather it down towards the middle of the nail.
- The glitter should be subtle and thin, mimicking a soft winter glow.
23. Mismatched Holiday Mosaic
Mismatched festive nails combining stars, bows, and stripes across the set.
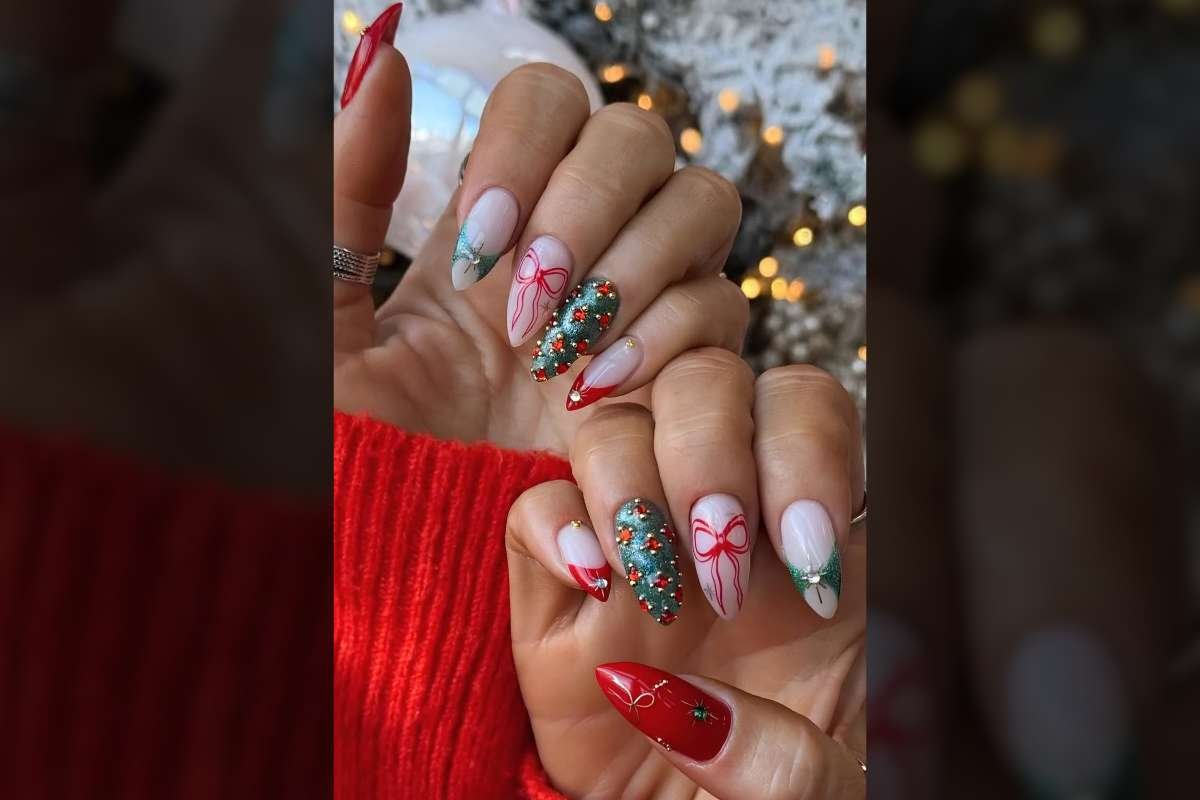
Why choose one design when you can have them all? This fun manicure uses a variety of festive elements across the set. Combine stars, sweet bows, and bold stripes. Use a cohesive color palette (like red, green, and gold) to tie it all together. It’s a playful, festive mosaic that shows off your creativity and holiday cheer.
Tips: Use an anchor color (like red) across all nails to unify the set, even with varied designs.
How To:
- Plan your five designs (stripes, dots, star, bow, solid) before starting.
- Use your chosen color palette (red, green, gold) consistently across the different art elements.
- Use stamping plates or nail art pens for varied, intricate patterns.
- Top coat all nails for a cohesive finish.
24. Blush Snowflake Ballet
Soft blush nails with delicate white snowflakes and tiny metallic dots.

This is a soft, romantic take on a winter theme. Here’s how you do it: start with a delicate blush pink base. The art is composed of tiny, intricate white snowflakes and small, metallic dots. It looks like a gentle snow flurry on a clear evening. It’s a feminine, dreamy, and understated way to celebrate the holiday season.
Tips: Start with a creamy, soft blush base and use tiny, crisp white and metallic dots for the delicate contrast.
How To:
- Apply two coats of soft blush pink polish.
- Use white polish and a very fine brush to paint small, delicate snowflakes.
- Add tiny metallic dots (gold or silver) near the snowflakes for extra sparkle.
- Seal with a high-gloss top coat.
25. Reverse Gold Halo
Reverse French with gold or silver glitter hugging the cuticle line.
Give your manicure an instant upgrade with this chic detail. It’s a ‘reverse French’ style, where the focus is on the cuticle line. A thin halo of gold or silver glitter is painted right along the base of the nail. It subtly frames the color, adding a touch of luxury. It’s a simple technique that creates a major festive impact.
Tips: Use a fine-liner brush to trace the cuticle line precisely and keep the gold line thin and clean.
How To:
- Apply your main color (e.g., burgundy or nude).
- Using a thin detail brush and gold/silver glitter polish, trace a thin arch right along the cuticle line.
- Ensure the “halo” line is uniform and distinct.
- Seal the design with a clear top coat.
26. Statement Tree Shadow
Dark green or burgundy nails with a single statement accent nail (tree, star, or wreath).
This design uses a beautiful, deep solid color like dark green or rich burgundy. The drama comes from a single statement, an accent nail. On that nail, you can feature a simplified Christmas tree, a striking star, or an elegant wreath. It keeps the rest of the look clean. It’s powerful, dramatic, and perfectly balanced.
Tips: Keep the accent nail art simple and graphic so it stands out powerfully against the deep, dark base.
How To:
- Apply a deep, rich color (dark green, burgundy) on all nails except one accent nail.
- On the accent nail, use a contrasting color (gold, silver) to paint a simplified, geometric tree or star silhouette.
- Seal with a glossy top coat.
27. Pink Cane Heartbeat
Pink-toned Christmas nail set featuring candy-cane stripes and hearts.
Bring a sweet, playful energy to your holiday nails. This design uses pink tones as the core colors. The art features classic candy-cane stripes, but mixed with cute little hearts. The look is cheerful, vibrant, and full of warmth. It’s a charming way to celebrate the sweetest side of the Christmas season.
Tips: Use a bright, solid pink for the base and ensure the white candy cane stripes are evenly spaced.
How To:
- Apply a bright, solid pink polish on all nails.
- On accent nails, use white polish and a fine brush to paint thin, diagonal candy-cane stripes.
- Use a dotting tool to add small white hearts on other nails for a cheerful finish.
- Top coat all nails.
28. Sweater Glitter Heart
Neutral sweater-inspired nails combined with one glitter accent nail.
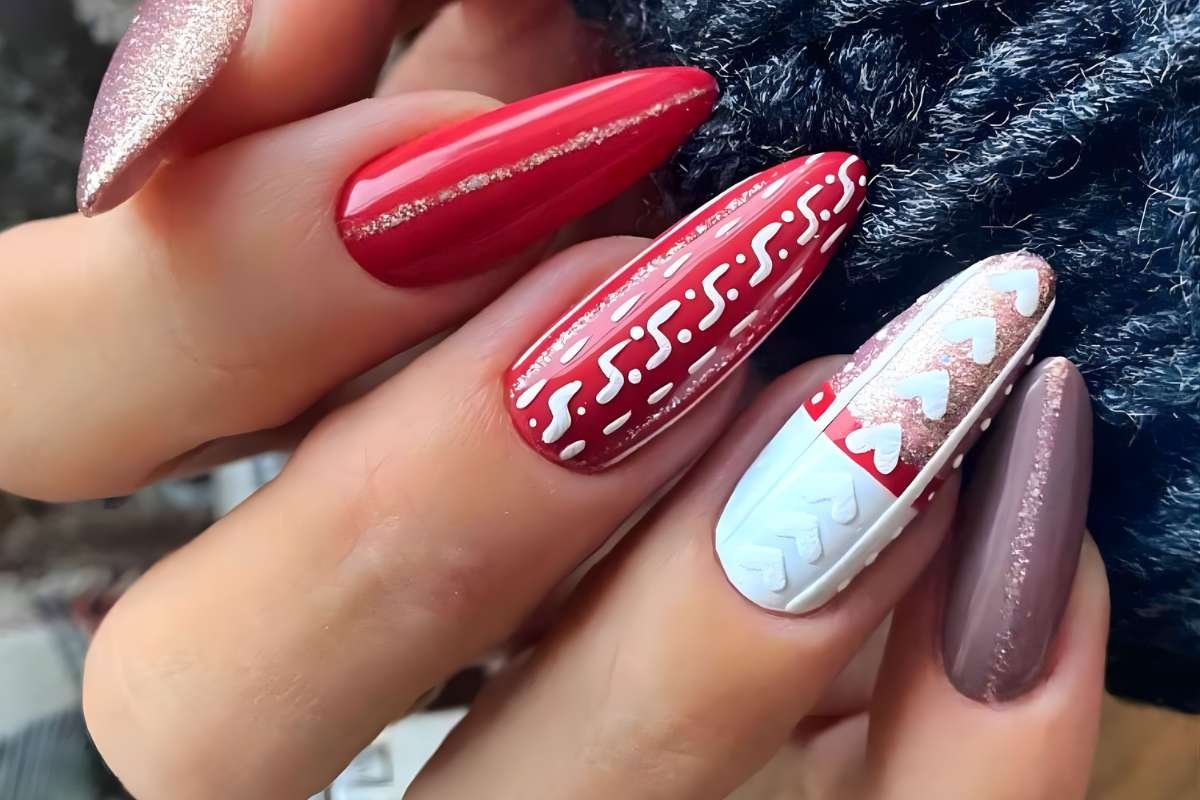
Combine cozy texture with sparkling shine for this perfect winter look. Most nails feature a neutral sweater-inspired texture, using a cable-knit effect. Then, one nail acts as the “hearth” with a beautiful, rich glitter polish. It’s the ultimate mix of warmth and dazzling light. It feels just like snuggling up by the fire.
Tips: Mix a matte top coat on the sweater nails with a high-shine top coat on the glitter nail for maximum texture contrast.
How To:
- Apply a neutral polish. Create a 3D sweater texture on four nails (see Cozy Knit Wonderland tip). Use a matte top coat on these.
- On the accent “hearth” nail, apply a beautiful, chunky glitter polish.
- Use a high-gloss top coat on the glitter nail for contrast.
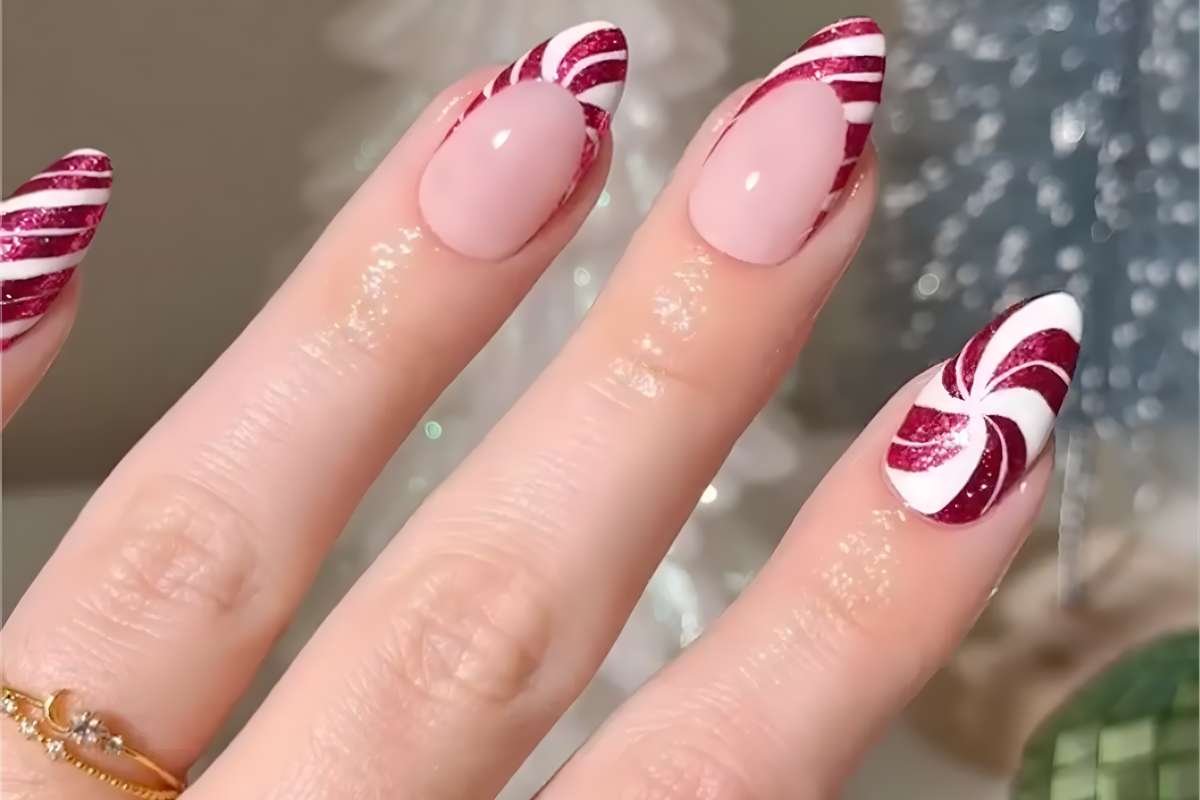
29. Diagonal Candy Rush
Sheer base with bold red or green diagonal tips for a modern candy-cane vibe.

This is a modern, graphic take on the candy cane. Use a sheer base to keep the focus crisp. Instead of a traditional tip, apply bold red or green diagonal tips. The clean lines give a fresh, sharp feel. It’s a sophisticated way to wear the colors of a candy cane without a single stripe. Clean, modern, and very chic.
Tips: Use nail vinyls or tape to achieve the perfect, razor-sharp diagonal line for the tip.
How To:
- Apply a sheer or clear base coat.
- Place striping tape diagonally across the nail, leaving the tip exposed.
- Paint the exposed tip with a bold red or green polish.
- Carefully remove the tape immediately while the polish is wet.
- Seal with a clear top coat.
30. Short Festive Spark
Short, practical nails in festive shades (red, green, gold) with tiny, minimal art.
Even short nails deserve holiday sparkle, don’t they? This design, compared to other Christmas nail ideas, is all about practical wearability combined with festive spirit. Use vibrant, classic holiday shades like red, green, or gold. The key is tiny, minimal art; a single dot, a small stripe, or a minute star. It’s a cute, manageable, and instantly festive look for everyone.
Tips: The secret is maintaining an excellent, healthy shape on the short nails and keeping the art extremely minimal.
How To:
- Shape and file short nails neatly. Apply a vibrant festive color (red, green, or gold).
- Use a very small dotting tool to add a tiny dot of a contrasting metallic color near the cuticle of one nail.
- Keep the rest of the nails simple and clean.
- Finish with a glossy top coat.
Conclusion:
Wow, what a collection of stunning looks! We have explored 30 of the best Christmas nail ideas; now you must decide and pick one. Remember, your manicure is a small canvas, but it makes a huge festive impact. It doesn’t matter if you love the elegance of deep emerald or the playful charm of candy canes; there is a perfect holiday style waiting for you. So, don’t be afraid to try something new and embrace the sparkle of the season.
Now, what are you waiting for? Pick your favorite design in these Christmas nail ideas and get that gorgeous manicure. In the end, remember to shine this Christmas brightly!
FAQs
1. Can I do detailed Christmas nail art at home?
Yes! Start with simple designs like dots, easy diagonal stripes, or pre-made festive nail stickers and wraps. A fine-tipped brush and patience are your best tools for small details.
2. How long do Christmas nail designs usually last?
With professional gel polish or acrylics, your festive manicure can easily last two to three weeks. For regular polish, expect five to seven days of cheerful wear, especially with a quality top coat.
3. What is the most popular color for Christmas nail ideas?
Classic, deep crimson red always tops the list, often followed closely by elegant emerald green and dazzling gold. These shades instantly feel festive and timeless for the holiday.
Thanks for Reading!
See More
100 Best Merry Christmas Wishes to Write on Christmas Cards